skip to main |
skip to sidebar
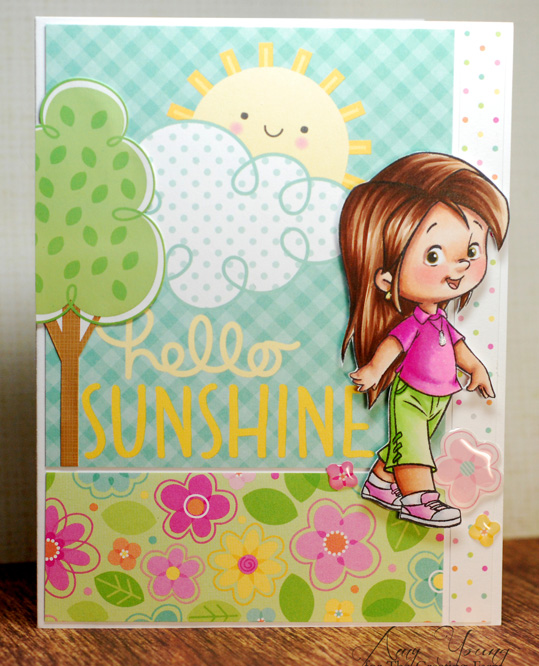
TGIF!
I made today's card for this month's 'anything goes' challenge over at Some Odd Girl. This beautiful Lounge Fairy digital stamp is one of the newest SOG cuties added to my collection and I couldn't wait to color her up. At first I didn't have a real plan for her, the only thing I knew for sure is that I wanted to color her hands yellow so that it would look like she had been busy collecting pollen from all the spring flowers. Once that was done I got the idea to color her hair black with a bit of yellow to kind of look like a honey bee. And just like that I had a busy bee fairy taking a short break before buzzing off to the next patch of flowers. I even added some yellow glitter to her hands and the tree stump to really help sell the magic. If you can't tell, I really had a blast watching this sweet image come to life under my markers. :)
Hope your weekend is a crafty one!
Supply list:
cardstock- Bazzill and Copic X-Press It
digital stamp- Some Odd Girl (Lounge Fairy)
stamp- Papertrey Ink (sentiment)
ink- Memento tuxedo black
My Favorite Things wonky stitched rectangle die
Prima flowers
Kaiser Craft gems
Doodlebug glitter
Wink of Stella clear glitter pen
Sharpie white marker
Copic markers:
skin- E000, E00, E11, R00, R20, E04
eyes- Y06, E99, E39, E59, BG000, 0
eye shadow- Y11, Y04, Y06
lips- RV21, RV14
hair- W10, W8, W6, E50, E51, E53, Y06
pollen- Y06, Y15, Y35
wings- G00, G000, BG0000
clothes- YG00, YG03, YG25, YG17, YG67, Y06, RV02, RV06, RV09, RV69
stump- E42, E43, E44, E47
grass- YG00, YG03, YG25, YG17
sky- BG0000, BG000, B60, C00, C0, 0, Y0000
Olo!
As April wraps up I realized that I hadn't gotten this month's cupcake from the Baker's Dozen set on a card yet. This early attempt at no-line coloring was actually done back in September and I can already see the progress that I've made in my no-line skills. I'm still happy with this sweet cupcake but now I see all the things I would add or do differently when I look at it. I paired it up with an extra large sentiment and turned the whole thing into a pretty little shaker card. The card still needed a bit more whimsy so I die cut these pretty butterflies and stuck them on top of the shaker for even more dimension.
Alrighty, time for me to scoot. Have a good one!
Supply list:
cardstock- Bazzill and Papertrey Ink
paper- Basic Grey (Piccadilly)
vellum
stamps- Papertrey Ink (Baker's Dozen set), Simon Says Stamp (sentiment)
ink- Memento desert sand and Studio Calico clear blue
Papertrey Ink Shakers and Sprinkles die
Memory Box butterfly dies
Kaiser Craft pearls
sequins
Wink of Stella clear glitter pen
Sharpie white marker
Copic markers:
cake- E23, E25, E29
frosting- YG0000, YG00, YG03
butterfly/flowers- RV10, RV13, RV14, Y000, E25
wrapper- YG21, YG25, YG17
shadow- C0, C2
Hello again!
How could I possibly make a girly 4 Seasons Spring card and not make her boy counterpart? Especially when this little dude is so freakin' adorable in his cargo pants and layered shirts... I mean, come on! In fact as much as I love the entire 4 Seasons Boy set this guy is probably my fave of the bunch. I used the same Spring Things collection from Doodlebug to build his world and still had plenty of colors to match from it for his outfit. Another quick and easy card full of color and happiness... just how I like them! ;)
Talk at'cha laters!
Supply list:
cardstock- Papertrey Ink and Copic X-Press It
paper- Doodlebug (Spring Things)
stamp- CC Designs (Roberto's Rascals 4 Seasons Boys set)
ink- Memento tuxedo black
Doodlebug sun sticker
Doodlebug shaped sprinkles
Copic markers:
skin- E000, E00, E11, R00, R20, E04
eyes- YG23
hair- E42, E43, E44
clothes- YR61, YR65, YR16, YR68, C0, C2, BG53, BG57, BG49, BG70, BG90, BG45
Hello, hello!
I've made a girly little birthday card for 7 Kids Crafting Supply Store
today and it features the mini cuties from The Greeting Farm's Little Party stamp set. These mini stamps are so perfect for scene building that I just had to do a bit of masking and create the girliest birthday party that I could come up with. To do that, I figured that an eclectic mix of pretty paper scraps would give the party bunting a soft, shabby chic kind of look so I grabbed my scissors to do some easy paper piecing. Once that was done I was so happy with the results that I also decided to go the extra mile and paper piece their dresses as well with some of the same papers. I don't know about you but I kinda wish that I was invited to this pretty party too, LOL! ;)
There is still plenty of time to enter this month's challenge over on the 7 Kids blog. Kelly has an awesome $20 gift certificate up for grabs and you could be the lucky winner so get to creating and join the fun!
Supply list:
cardstock- Bazzill and Papertrey Ink
paper- Making Memories (yellow floral), October Afternoon (pink floral and green stripe), Basic Grey (green swirl), My Mind's Eye (blue floral)
stamps- The Greeting Farm (Little Party set)
ink- Memento tuxedo black and Studio Calico blush crush
My Favorite Things wonky stitched rectangle die
sequins
Ranger liquid pearls
Copic markers:
girl 1
skin- YR20, E21, E11, BV20, R00, R20
hair- C4, C7, C9, 100
girl 2
skin- E000, E00, E11, R00, R20, E04
hair- E21, E23, E25, E29
girl 3
skin- E21, E34, E25, E04, R20
hair- E57, E49, W10
bow- BG10, G00, BG72
background- R0000, R01, 0, E41, E42, E43, E44
table- E44, E81
lemonade pitcher- Y11, Y21, BG000
Good morning!
With spring fully upon us I figured it was time to pull out my 4 Seasons Girls set from CC Designs and get this sweet girl on a card. I absolutely adore this set and have had a lot of fun coloring up her fall and winter sisters last year. Once again I went to Doodlebug papers for my inspiration and the new Spring Things collection was just what I needed. There is a cuteness factor to these papers that totally suits these little Rascals and makes getting crafty so easy, plus it is always fun to try and match those classic Doodlebug colors with my Copics. Alrighty then, time for me to get out and enjoy some sunshine myself.
TTYL!
Supply list:
cardstock- Papertrey Ink and Copic X-Press It
paper- Doodlebug (Spring Things)
stamp- CC Designs (Roberto's Rascals 4 Seasons Girls set)
ink- Memento tuxedo black
Doodlebug Spring Things stickers
Doodlebug shaped sprinkles
Smooch pearl
Copic markers:
skin- E000, E00, E11, E04, R00, R20
eyes- E84
hair- E21, E23, E27, E29
clothes- YG0000, YG11, YG01, YG23, YG25, RV02, RV55, RV06, C0, C2, RV10, RV52, Y11, Y02, Y21
TGIF!
My day is going to be busy, busy so this post will have to be short and sweet. It has been too long since I colored up a Tiddly Inks cutie so I went searching through my collection and found Ellie Says Hi. How has this darling girl gone this long before getting on a card? Well the wait for Ellie to fulfill her crafty destiny was over and I paired her up with some older papers from Imaginisce because the spring time colors totally suited her cheery personality. The result is a happy little card that was a lot of fun to put together. :)
Have a great weekend everybody!
Supply list:
cardstock- Papertrey Ink
paper- Imaginisce (spring)
digital stamp- Tiddly Inks (Ellie Says Hi)
stamps- Simon Says Stamp (sentiment)
ink- Memento grey flannel and nautical blue
Simon Says Stamp scallop border die
sequins
Kaiser Craft gems
Copic markers:
skin- E000, E00, E11, R00, R20, E04
hair- YR30, YR31, Y24
clothes- RV91, RV21, R21, R22, W0, W2, W4, W6, B39, BV29, YG25, YG67, Y11, Y15, BG45, BG72, RV25, RV29, B37
Hi there!
So I watched the new updated Pete's Dragon movie on Netflix this past week and even though it was nothing like the original one that I remember from my childhood it was still very cute and entertaining. So it's really no surprise that dragons were on my mind when it came time to create. Luckily I had this cute digi stamp called Me And My Dragon from ADFD on the ol' hard drive. I printed it out once on white cardstock then again on this green pattern paper to do a little paper piecing on the big guy himself. I like how the subtle print almost looks like the light dappling through trees onto his green scales. The kiddo on the original image is sporting pigtails but since I was going for Pete and Elliot I just chopped them right off when I fussy cut the image. I think I succeeded in taking myself back in time just a bit to my younger days when I would wish for a dragon pal all my own too. ;)
Later gators!
Supply list:
cardstock- Papertrey Ink
paper- Photoplay (Happy Glamper), DCWV (green)
digital stamp- A Day For Daisies (Me and My Dragon)
stamps- Avery Elle (sentiment), Simon Says Stamp (speech bubble)
ink- Memento tuxedo black and rich cocoa
Lawn Fawn stitched hills die
Prima flowers
Kaiser Craft gems
Copic markers:
dragon- YG11, G43, G82, R30, RV63, V05, V06, YG00, YG17
kid- E000, E00, E11, E04, R00, R20
hair- E41, E43, E44
clothes- 719, YR04, YR18, B01, BG45, BG49, E49
Olo!
So back in the day I got a handful of the Lulu stamps from Stamping Bella because I loved their sweet demeanor and crazy hair. The only issue I had with these cuties is that the stamps tended to have a lot of solid areas that would stamp black, including the hair. This always felt very limiting as far as color palettes went and I missed not getting to color in their hair. Now that I've been playing around with no-line coloring I decided to re-visit these little ladies and give them a whole new look. First up was the Ruby and Rose Lulu stamp and I can't even tell you how much fun I had giving these girls colorful hair and clothes. This technique totally transforms them... it kinda feels like I have brand new stamps to play with and I can't wait to get the others on cards of their own now too. :)
Supply list:
cardstock- Bazzill, Papertrey Ink and Copic X-Press It
stamps- Stamping Bella (Ruby and Rose Lulu), Papertrey Ink (sentiment)
ink- Memento desert sand and Hero Arts purple ombre
Papertrey Ink sentiment split curve horizontal die
cloud dies
Prima flowers
Kaiser Craft pearls
Copic markers:
skin- E000, E00, E11, E04, R00, R20
hair- E35, E57, E49
hair- YR15, E97, E09, E18
eyeshadow- BG000, BG72
eyeshadow- YG00, YG61
dress- RV63, RV55, V05, V06, V09, C1
dress- BG02, BG53, BG05, BG07, B06, B18, C1
shoes- W7, E49
flowers- Y000, Y11, Y21, Y19, YG01, YG25, YG67
Hello crafty friends!
It's Tuesday and that means I have another fun card that I made for 7 Kids Your Crafting Supply Store. Being the crazy cat lady that I am, I've had this super cute Meoples Meowy stamp set from CC Designs on my wish list ever since it was released. So when I saw it in the 7 Kids store I snapped it right up. For this CAS card design I chose to ink up the little peeking kitty and color him up to be a grey tabby. I also wanted him to have some big, beautiful eyes so I went ahead and used my Copics to draw them in. Since I had a grey tabby gracing my card I searched my paper scrap bag for some grey and yellow paper to match back to him. Yellow and grey is such a happy combo, definitely one of my faves. And talk about a quick card to pull together... coloring and everything took less than an hour. And don't we all have those days with too little time to create but the itch to get crafty?
There is still plenty of time to enter this month's challenge over on the 7 Kids blog. Kelly has a gift certificate up for grabs and you could be the lucky winner!
Supply list:
cardstock- Papertrey Ink and Copic X-Press It
paper- October Afternoon
stamp- CC Designs (Meoples Meowy set)
ink- Memento tuxedo black
Teresa Collins enamel dots
Avery Elle hello die cut
Copic markers:
eyes- YG00, YG03, YG95
fur- W0, W3, W4, W6, W10, R30
Good morning!
My pal Tracey recently shared with me a sheet of super cute paper that had these different strips of girly skull and bow patterns on it. As soon as I saw it I knew that it would be perfect with this classic Creeper from the Sweet & Toxic set. Don't they look like they were made to go together? So of course I pulled my Copic colors from the print and I think she turned out quite lovely. I added a sprinkling of fun and funky sequins to add a bit more sparkle to the card and a cheeky sort of sentiment that totally suits this sweet, or possibly toxic, Creeper... LOL!
Alrighty crafty friends, take care and have a wonderful day! :)
Supply list:
cardstock- Bazzill, Papertrey Ink and Copic X-Press It
paper- Creative Imaginations
stamps- The Greeting Farm (Sweet and Toxic set), Paper Smooches (sentiment), My Favorite Things (Distressed Patterns set)
ink- Memento tuxedo black and Angel Pink
My Favorite Things diagonal stitched rectangle die
Doodlebug sequins
Wink of Stella clear glitter pen
Copic markers:
skin- E000, E00, E11, R00, R20, E04
eyes- YG93, YG97, BG000
eyeshadow- V93
hair- C10, C8, C6, RV55, RV06, RV17
clothes- C0, C1, C2, RV10, R81, R83, V01, V12, V15, YG91, YG93, YG97, RV06, RV17
TGIF everybody!
I was debating on just what stamp would be on my final Easter card for 2017, up until the day my Stamping Bella order arrived. I mean, just look at this cutie... how could I not get Ella Loves Easter on a card before the big day? So when it came time to create yesterday I looked to see what this week's Bellarific challenge was and got to work. It was a great sketch which made putting the card together pretty darn quick. This left me plenty of time to not only color up Ella but also give her a peaceful valley to live in. Simple and sweet, just how Easter should be, LOL!
So happy Easter to all my crafty friends who are enjoying the holiday this weekend. Sneak a couple of jellybeans for me! ;)
Supply list:
cardstock- Papertrey Ink and Copic X-Press It
paper- Bella Blvd
stamps- Stamping Bella (Tiny Townie Ella Loves Easter), Verve (sentiment)
ink- Memento tuxedo black and angel pink
My Favorite Things stitched scallop rectangle die
My Favorite Things stitched circle die
Doodlebug flower Sprinkles
Sharpie white marker
Copic markers:
skin- E000, E00, E11, R00, R20, E04
hair- E42, E43, E44
costume- RV000, RV52, R81, R83, V01, V12, V17, YR30, Y11, Y21, E49
basket/eggs- E30, E33, E35, B000, RV06, RV14, RV29, R81, R83, Y35, YR04, YR30, Y11, Y21, YG01, YG03, YG25, B02, BG05, B06, V01, V12, V17, E81
chocolate bunny- E25, E57, E49
background- YG0000, YG00, YG03, YG25, YG17, YG67, BG0000
Hello again!
It's a super busy morning for me so I'm going to post and run. This card has been percolating in my brain for quite awhile and I finally made time yesterday to tackle this fantastic Funny Farm background scene. And I paired it up with this super cute Chicky Girl and I love the two together! I can just imagine her finding the perfect Easter egg only to find it become the perfect Easter chick... awww so sweet!
Ok, I really got to get moving... toodles!
Supply list:
cardstock- Papertrey Ink and Bazzill
stamps- CC Designs (Roberto's Rascals Chicky Girl), Kraftin Kimmie Stamps (The Funny Farm), Simon Says Stamp (sentiment)
ink- Memento tuxedo black
My Favorite Things stitched rectangle die
Copic markers:
skin- E000, E00, E11, E04, R00, R20
hair- YR12, YR27, E99
clothes- B91, B93, B95, B97, RV52, V12, V15, E49, Y00, E81, Y35, YR24, E49
chick- Y21, Y35, Y04, YR04
sky- YR30, YR31, R0000
clouds- YR30, Y00, BV0000, B0000
barn- R05, E08, E18, C4, C6, E81
background trees/bushes- G28, YG01, YG03, YG95
fields- E30, E31, E34, E35
foreground bushes- YG00, YG03, YG25, YG67
foreground dirt- E30, E53, E55, E44
wood fence/crate- E41, E43, E44, C6
Hey there!
It's the second Wednesday of the new month and that means it's time for the April 'anything goes' challenge over on the 7 Kids challenge blog.
Playing along is easy, all you have to do is use at least one product
that can be found in the 7 Kids Your Crafting Supply Store and link back to the challenge
blog in your own post, which gives you a chance at winning a $20 gift
certificate at the end of the month... who doesn't love that?
For my challenge inspiration card I just had to ink up this new beauty from Whimsy Stamps called Flower Gardener. These portrait style stamps are wonderful for practicing my no-line coloring because they make it easy to really pay attention to all the little details of the image. With spring finally having officially sprung I wanted this pretty girl to be decked out in happy shades of yellow and pink and I actually colored her outfit before her hair which is not my usual process. I'm glad I did though because once I settled on black hair to add some high contrast, if I had done this same hair first there is a 99% likelihood that I would have accidentally pulled black into the yellow. As it is, luck was with me and I adore how she turned out all dressed up in her Easter bonnet.
Alrighty, I hope to see some of my crafty friends joining the fun with me this month over at 7 Kids! :)
Supply list:
cardstock- Papertrey Ink
paper- Basic Grey
stamps- Whimsy Stamps (Flower Gardener), Simon Says Stamp (sentiment)
ink- Memento desert sand and Versamark clear
American Crafts Zing white embossing powder
May Arts ribbon
My Favorite Things wonky stitched rectangle die
My Favorite Things stitched scallop circle die
Ranger liquid pearls
Kaiser Craft pearls
Sharpie white marker
Copic markers:
skin- E000, E00, E21, E13, E04, R00, R20
lips- R20, R83, R85
eyes- E39, E57, E49, 100, BG000
eyeshadow- BG70, BG72
hair- N5, N7, N9, 100
clothes- Y04, Y06, Y19, V20, V22, R81, R83, R85
flowers/leaves- Y000, E81, 0, Y26, Y28, YG00, YG03, YG95
background- BG0000
Hello crafty friends!
It's Tuesday and that means I have another fun card that I made for 7 Kids Your Crafting Supply Store. This week I decided to take two of my Anya stamps and create an entirely new Anya just by doing a simple head swap. First, I inked up For You Anya's head because I love her side swept chignon. Her outfit on the other hand was a bit too summer casual for the card I wanted to make so instead I grabbed Lovable Anya and inked up just her body. This gave me the perfect little Easter dress for my new Anya. Quick tip... when you are fussy cutting the body, be sure to leave a little triangle of cardstock above the neck so that you have a space to glue the head onto. If you haven't tried this technique with your Greeting Farm stamps I highly recommend it. Not only does it broaden the range of these super cute stamps but coming up with creative pairings can be so fun and rewarding!
The March challenge has closed but be sure to check out the 7 Kids blog tomorrow to see if you were the lucky winner and join in the new challenge for April. See you there!
Supply list:
cardstock- Papertrey Ink and Copic X-Press It
paper- Pebbles
stamps- The Greeting Farm (For You Anya and Lovable Anya), Papertrey Ink (Petite Places Walk in the Park and Keep it Simple Easter set)
ink- Memento tuxedo black and Studio Calico glass slipper
Simon Says Stamp scallop border die
Prima flowers
Kaiser Craft pearls
Copic markers:
skin- E000, E00, E11, E04, R00, R20
hair- E34, E35, E57, E59
clothes- YG00, YG03, YG67, G000, G00, BG13, Y000, E81, 0, E84, E87, E89
Good morning!
I'm hopping on real quick to share a super fun Easter card that I made this weekend. This spunky little guy is Roberto's Rascals Bunny Boy from CC Designs and he looks super excited for Easter to arrive all dressed up in his pink bunny costume. Why pink you ask? Ever watch the movie A Christmas Story? That part where the dad calls Ralphie a pink nightmare always cracks me up. This cutie is anything but a nightmare, in fact he is fitting right in to this Bunnyville scene that I cut out of this year's Doodlebug 6x6 pad called Easter Express. I love that it did all of the work of creating a scene for me, making this card super quick to put together. There's no denying that this is a bright and happy Easter card sure to put a smile on someone's face. :)
Later gators!
Supply list:
cardstock- Papertrey Ink and Copic X-Press It
paper- Doodlebug (Easter Express)
stamp- CC Designs (Roberto's Rascals Bunny Boy)
ink- Memento tuxedo black
Copic markers:
skin- E000, E00, E11, E04, R00, R20
hair- E50, E51, E53, E55
costume- RV52, RV55, RV04, E81, 0, C3
chick- YR30, YR31, Y11, Y35, YR04
TGIF!
With Easter fast approaching it was time to get another Easter card done. I went back to my A Day For Daisies digis and found this sweet Mr. Bunny called Flowers For Mrs. I really liked that he gave me the opportunity to create a more guy appropriate Easter card. So you won't find any pastel pinks or purples with this guy, instead it's a cool kinda vintage looking teal and rust combo that totally suits this cutie. It was a challenge figuring out the right Copic color combos to match that paper but so worth it in the end because I especially love how that red looks... definitely going to be using that combo again. I kept the layout design clean and simple with a single wood veneer bird for embellishing since I didn't want to fuss things up too much.
Alrighty fellow crafters, have a creative weekend! :)
Supply list:
cardstock- Papertrey Ink and Copic X-Press It
paper- DCWV
digital stamp- A Day For Daisies (Flowers For Mrs.)
stamp- Simon Says Stamp (sentiment)
ink- Memento rich cocoa
Studio Calico wood veneer bird
Pretty Pink Posh stitched borders 4 die
Copic markers:
fur- E40, E41, E43, R30, R21
shirt- BG90, G00, YG41, YG45
overalls- YR82, R43, R14, E08, E79
boots- E44, E47, E49
grass/flowers- YG41, YG45, BG96, YR0000, R14
sky- BG0000, B0000, 0
Hey there!
My wonderful friend Tracey celebrated her birthday on Tuesday and I wanted to make her a very special card for the occasion. So I started to think about which image would be perfect and suddenly this classic Greeting Farm digi called Pretty Head Lily popped into my brain. As much as I adore both her and her sister Rachel neither one has ever made it onto a card of mine. I got to thinking about why that was and I think it is because I always wished that I could color in those big beautiful eyes rather than have them print out black. Now that I've been playing around with no-line coloring the solution to that problem was staring me right in the face. All I had to do once Lily was in Word was click on the Format button, choose Recolor and then Washout. By doing this, I was able to print Lily out in a very light grey line that totally disappeared once I started coloring. This allowed me to finally be able to color in her gorgeous eyes and I am SO excited to finally give this older image a new chance at fulfilling its crafty destiny. In fact I had such a blast coloring Lily up that now I'm secretly hoping Marie will add some new Pretty Heads to the store, LOL! And I'm also adding this as my second entry into the 'spring flowers' Farm Fresh Challenge since there is practically a whole flower garden going on here. ;)
Laters!
Supply list:
cardstock- Papertrey Ink and Copic X-Press It
digital stamp- The Greeting Farm (Pretty Head Lily)
stamp- Papertrey Ink (Keep It Simple Birthday III)
ink- Papertrey Ink shaded lilac
Papertrey Ink die
My Favorite Things stitched scallop circle die
Prima flowers
Kaiser Craft pearls
Ranger liquid pearls
Creative Imaginations pearl brads
Copic markers:
skin- E000, E00, E21, E13, E04, R00, R20
hair- YR30, YR31, E33, E35
eyes- B63, B66, B69, 100, BG000
eyelashes- E49
eyeshadow- YG0000, YG00, YG93
lips- R20, RV42, RV13
clothes- V01, V12, V15, E81, C1, C5, C6, C9
Olo!
Just a quick post before I head off to start the day. I'm still working my way through the super cute Bloom kit from TGF and today little Dia is getting herself on a card. She seemed like a bright and happy Bean so I dug way back in my Doodlebug scrap papers to find this cool stitched flower looking print. When it came time to color Dia I thought it would be fun to turn her curly hair into a grassy bed for the flowers adorning it. Then she told me that her dress needed to be extra sparkly so I added Doodlebug glitter in two shades of blue until Dia was happy with her look. ;)
Alrighty, before I wrap this up I want to enter this card into the April Farm Fresh Challenge 'spring flowers'.
I hope your day is a crafty one!
Supply list:
cardstock- Papertrey Ink and Copic X-Press It
paper- Doodlebug
stamps- The Greeting Farm (Bloom Bean kit)
ink- Memento tuxedo black and angel pink
Papertrey Ink leaf die
Simon Says Stamp small leaf die
Doodlebug glitter sprinkles
Doodlebug glitter
Copic markers:
E000, E00, E11, E04, R00, R20
hair- YG01, YG25, YG17, G29, Y02
flowers/dress- Y35, Y38, YR04, RV25, RV09, RV19, B00, B02, B04, B06, B39, 0
Hello there!
The sun is shining on this fine Tuesday and I've got another card that I've made for 7 Kids Your Crafting Supply Store. This week I've been having all sorts of inky fun with a new-to-me line of stamps called All Dressed Up from LDRS Creative. I have been admiring so many cards using these beautiful little ladies over the last few months that I finally had to jump in and get a few for myself. The first one to get on a card is Everything Stops For Walkies. Now the original image has her leaning against a light post but since I didn't need that for the design I had in mind I simply didn't add any ink to the post before stamping. That way, once I added the pretty pattern paper to my card it appears that she is leaning against it instead. And once again I've been doing a bit of no-line coloring... I love how her shirt turned out but the jeans could use more practice. All in all though, I really had a blast with this sweet image. :)
There is just under a week left to enter this month's challenge over on the 7 Kids blog. Kelly has an awesome $50 gift certificate up for grabs and you could be the lucky winner so get to creating and join the fun!
Supply list:
cardstock- Papertrey Ink and Copic X-Press It
paper- Heidi Swapp (stripe)
stamps- LDRS Creative (Everything Stops For Walkies), Simon Says Stamp (sentiment)
ink- Memento desert sand and Versafine onyx black
Doodlebug sun sticker
My Favorite Things Blueprints die
Prima flowers
Kaiser Craft pearls
Sakura stardust glitter pen
Copic markers:
skin- E00, E21, E13, E04, R00, R20
hair- YR12, YR27, E39, E59
clothes- B21, B37, B39, BV29, R22, R05, R20, RV42, Y38, YR04, YR01, E95, FYG1, YG00, YG21, YG25, YG41, G07, G00, BG34, E81, E84, E87, E89, W1, W2
dog- T0, T1, T3, T5, T7, T10, 0
grass- YG00, YG03, YG25, YG17
sky- BG70, 0
Good morning!
I've got another Easter card to share today, this time I've colored up a darling stamp from Impronte d'Autore called Tu Mi Rendi Felice. The happiness on this little gal's face is totally infectious. I decided to color her into a scene on Easter morning where during her egg hunt she finds an even more special surprise behind those bushes. The bunny on the other hand doesn't look quite as excited about all this as she does, LOL! At first I was planning on using some kind of rectangle die to trim out the scene a bit but all of them took off too much to my liking. Finally I settled on cutting a frame and let it float in the middle of the scene instead so I could still draw attention to the girl and bunny without losing any of the background, now I'm a happy girl too. :)
Alrighty friends, gotta jet. Talk at'cha later!
Supply list:
cardstock- Papertrey Ink and Copic X-Press It
paper- Doodlebug (glitter floral)
stamps- Impronte d'Autore (Tu Mi Rendi Felice), Simon Says Stamp (sentiment)
ink- Memento tuxedo black and Versamark clear
American Crafts Zing white embossing powder
My Favorite Things stitched scallop rectangle frame
Easter Egg stickers
Wink of Stella clear glitter pen
Copic markers:
skin- E000, E00, E11, E04, R00, R20
hair- E50, E51, E53, E55
clothes- RV000, RV21, RV14, RV29, E31, E34, E35
bunny- E40, E41, E43, R30, R20
grass/bush- YG00, YG01, YG03, YG25, YG17, YG67, G29
sky- B0000, B000, 0